
How to Screenshot Windows 10
Capturing screenshots on Windows 10 is a straightforward process, offering various options based on your needs. Here’s a comprehensive guide on how to take screenshots using different methods:
Whole Screen Screenshot
To capture your entire screen, use the Print Screen (PrtScn) key, usually located on the top row of your keyboard.
- Press and hold the PrtScn key. On some keyboards, you might need to hold down the Shift or Function (Fn) key alongside it.
- Open an application that supports image insertion (e.g., Word, Google Docs, Photoshop).
- Press Ctrl+V to paste the screenshot into the application.
Single Window Screenshot
If you want to capture only the active window:
- Open the desired window.
- Press Alt+PrtScn to capture it.
- Paste the screenshot by pressing Ctrl+V in the application of your choice.
Partial Screen Screenshot
To capture a specific portion of your screen:
- Press Windows+Shift+S simultaneously.
- Drag the selection box over the area you want to capture.
- Paste the screenshot using Ctrl+V.
Using the Snipping Tool or Snip & Sketch
Windows provides built-in tools for capturing specific areas:
- Search for and open the Snipping Tool or Snip & Sketch application.
- Choose the desired snip type (free-form, rectangular, window, full-screen).
- Capture the area and save the screenshot.
Windows Key-Print Screen Shortcut
This convenient method saves a screenshot directly as an image file:
- Press the Windows key + Print Screen key simultaneously.
- The screen briefly dims to confirm the capture.
- The screenshot is automatically saved in the Pictures > Screenshots folder.
Alt-Windows Key-Print Screen Shortcut
Captures only the active window using the Windows Game Bar:
- Press Alt + Windows key + Print Screen.
- The screenshot is saved to the Videos > Captures folder.
Remember, depending on your keyboard, you might need to use the Function (Fn) key in combination with the Print Screen key for some shortcuts. Additionally, the default behavior of the Print Screen key is to copy the screenshot to the clipboard, not save it as a file. You can paste it into applications like Word, Google Docs, or image editors.
In summary, capturing screenshots on Windows 10 is flexible and can be tailored to your specific needs. Whether you want to capture the whole screen, a single window, or a portion, these methods offer a variety of options for effective screenshot capture.
Utilizing the Print Screen Key with OneDrive
For those unfamiliar with capturing screenshots on Windows 10, pressing the Print Screen button might lead to confusion, especially if the function doesn’t seem to work. This could be due to a lack of an active account. A notable advancement in Windows screenshots emerged in 2015. This innovation enables users to save either the full screen or an active window using Print Screen or Alt-Print Screen, similar to the standard Print Screen method.
However, an even more convenient approach involves navigating to OneDrive’s Settings panel. By selecting the ‘Automatically Save Screenshots / Capture to OneDrive’ option under the Backup tab, the need for image apps, clipboard pasting, and separate saving steps is eliminated. Upon hitting Print Screen, the screenshot is immediately saved as an image file.
The Action Center, located in the right slide-out panel of the screen, provides alerts when a screenshot is saved. Clicking the notification allows quick access to the stored screenshot folder. Frequent users might consider opting for more cloud storage than the free 5GB. An Office 365 subscription, starting at $6.99 per month, offers 1TB of storage along with popular productivity applications.
How to Capture Screenshots Using the Snip & Sketch Tool
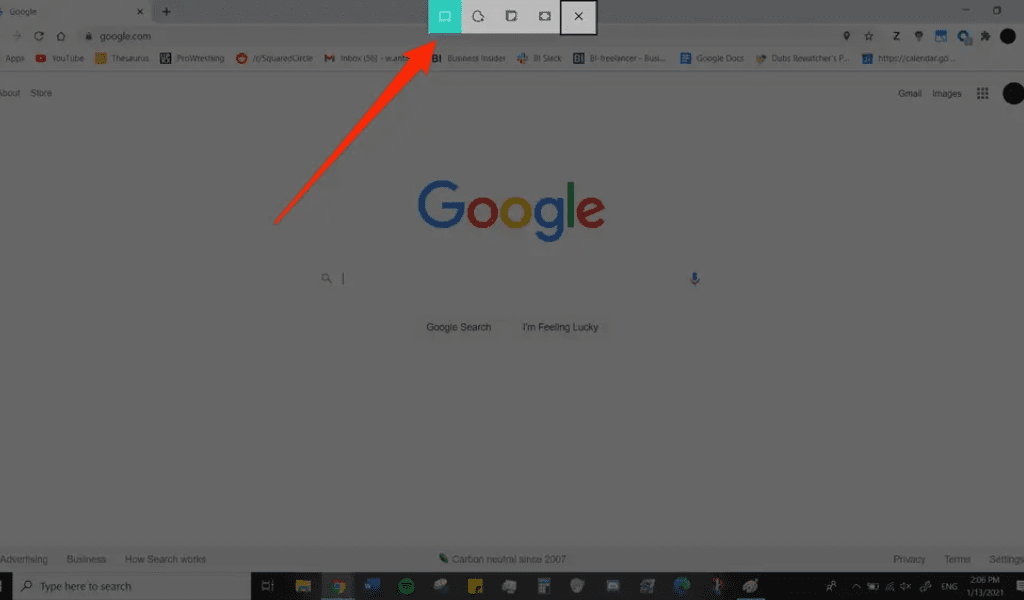
For those aiming to edit, annotate, or share screen captures, the Snip & Sketch tool is an excellent choice on Windows 10. To launch this tool, the keyboard shortcut Windows Key + Shift + S is utilized. This action results in a dimming of the screen and a menu appearing at the top. The menu offers options for capturing a rectangular, free-form, window, or full-screen image.
This tool provides various ways to capture screenshots:
After capturing a screenshot, it’s saved to the clipboard, and a preview notification emerges at the lower-right corner of the screen. Clicking on the preview notification opens the Snip & Sketch app, allowing users to save, share, or edit the screenshot using the available sketching tools.
How to Capture Screenshots Using the Snipping Tool
When it comes to customizing, annotating, or sharing screen captures, the Snipping Tool offers a reliable method for capturing screenshots. Originating in Windows Vista, this tool remains effective. Users can employ the Snipping Tool in various ways on Windows 10:
Capturing a screenshot of the entire computer screen. Selecting a rectangular area on the screen. Taking a free-form screenshot.
It’s important to note that capturing screenshots with the Snipping Tool doesn’t automatically save them as image files. However, the option to save them as such is provided.
Here’s How to Utilize the Snip and Snipping Tools to Capture Screenshots:
- Access the search bar, which can be displayed by right-clicking on the taskbar, hovering over Search, and selecting Show Search Box. This action opens a window featuring the active Snip & Sketch tool.
- Select the desired mode for the “snip” you wish to take, such as free-form, rectangular, window, or full-screen capture. In this explanation, we’ll demonstrate capturing a rectangular screen snip.
- The Snipping Tool also permits the setting of a snapshot delay, allowing for timed screenshots, useful for capturing pop-up menus and tooltips. The delay time is determined in seconds, adjustable by clicking on the delay option.
- When prepared to capture the screenshot, select New. The screen will fade, and a crosshair pointer will appear. If a delay is chosen, the screen will fade after the specified number of seconds.
Capture the desired screenshot:
- For the Rectangular screen snip mode, create a rectangle on the screen by clicking and dragging. The resulting screenshot will be confined to the drawn rectangle.
- With the Free-form snip, create any desired shape. Release the right-click button to take the screenshot once the desired shape is drawn.
- For the Window snip, clicking on the desired windows captures a screenshot of them.
- Finally, choosing the full-screen snip option captures a screenshot of the entire screen.
After capturing the screenshot, various options are available:
- Save the image as a file by selecting File > Save as… and choosing a location.
- Send the screenshot as an email attachment using File > Send to > Email recipient.
- Print the screenshot using File > Print.
- Copy the screenshot to the clipboard by selecting Edit > Copy.
- Utilize the Pen or Highlighter functions to modify the screenshot, including changing the pen’s color to draw attention to specific areas.
Utilizing the Game Bar for Screen Recording in Windows 10
Windows 10 comes with the Game Bar pre-installed. To ensure its functionality, especially before recording videos, it’s wise to confirm its activation. Follow these steps:
Press Windows Key + G to activate the Game Bar using your keyboard. If this doesn’t work, you can ensure its functionality:
- Access the Start Menu.
- Click on the cog symbol to access Settings.
- Select “Gaming.”
Toggle the switch labeled “Record game clips, screenshots, and broadcast using Game bar” to the On position.
It’s important to note that the Game Bar can only record the screen of a single application or active window at a time. Moreover, it cannot record the entire screen or specific applications like File Explorer or Maps. Therefore, it’s advisable to experiment with the tool beforehand.
Taking Screenshots on Windows 11
Windows 11 offers several screenshot methods similar to those on Windows 10. These include utilizing the PrtSc key, Windows Key + PrtSc for full-screen captures, Windows Key + Shift + S for partial screen captures, and employing the Snipping Tool for customized screenshots.
For more convenience, third-party applications like Lightshot, Greenshot, and Snagit offer additional features and capabilities.
How to Capture Screenshots on Various Devices
In addition to Windows PCs, taking screenshots on smartphones and other devices is essential. Our guide on ‘How to Take a Screenshot on Any Device’ outlines the techniques that apply to all non-PC devices with screens.
Exploring Third-Party Screenshot Apps for Windows
If the built-in Windows methods aren’t satisfying, there are third-party screenshot applications that offer additional features.
Lightshot: A free screenshot application facilitating quick sharing on social media platforms. Lightshot enhances the Print Screen function in Windows 10 and offers advanced editing options.
Greenshot: Another free program enabling screenshot modification, customization, and capturing entire scrolling web pages.
Snagit: This comprehensive screenshot application allows for full-page screenshots, animated GIF creation, and more. However, the VIP version comes at a cost of $50, and while there’s a 30-day free trial, images captured during the trial period will be watermarked. Additionally, you can also read on – How to edit a video with background music.
Saving Your Screenshot as a File
To save a screenshot as a file, use Windows+Print Screen, holding down the Windows logo key while pressing the Print Screen key (PrtScrn or PrtScn). On laptops, Windows+Fn+PrtScn might be necessary.
- The screen will momentarily dim to indicate successful capture.
- Screenshots are saved as PNG files in the ‘Screenshots’ folder within the ‘Pictures’ directory of your user account. If multiple screenshots are taken, each will be labeled with a number.
Typical location: C:\Users\NAME\Pictures\Screenshots
Saving a Screenshot to Your Clipboar
Pressing the Print Screen key (or Fn+Print Screen on certain laptops) transfers the screenshot to your clipboard.
Windows copies the screenshot to the clipboard, allowing pasting into applications that handle images, such as image editors, word processors, or spreadsheets. Use Edit > Paste or Ctrl+V to paste.
Capturing a Single Window Screenshot to Your Clipboard
For capturing a single window rather than the entire screen, press Alt+Print Screen (Alt+Fn+Print Screen on some laptops).
Capturing a Partial Screen Screenshot
Quickly capture a screenshot with Snip & Sketch using Windows+Shift+S. The screen will gray out, and the mouse cursor turns into a crosshair.
A bar with buttons appears at the top of the screen:
- Rectangular Snip: Draw a rectangle on your screen to capture that area.
- Freeform Snip: Create a custom shape using your cursor, stylus, or finger on touch screens.
- Window Snip: Capture only a specific window by positioning the crosshair over it and clicking.
- Full-screen Snip: Capture the entire screen.
- Snipping Closed: Cancel without capturing (Esc can also be used).
Snip & Sketch remembers your last-used option when opened via the keyboard shortcut.
How to Capture Screenshots on Windows 11
Windows 11 offers multiple methods for capturing screenshots:
Method 1: Capture the Entire Screen with PrtSc Key
Use the PrtSc key on an active window in Windows 11, just like in Windows 10.
- Press PrtSc.
- The screenshot is copied to your clipboard, with no notification.
- Ctrl-V to paste it into applications like Microsoft Paint or Word, or even in an email body to view it.
Method 2: Windows Key + PrtSc Key for Full-Screen Screenshot
- Windows key + PrtSc keys (or PrtSc on active window) capture the full desktop, saving it to a folder on your computer.
- The screen will flash when done correctly, indicating a successful capture.
- Full-screen screenshots are saved in Pictures -> Screenshots.
Method 3: Snip & Sketch Tool for Partial Screen Capture
To capture a portion of the screen, use Windows+Shift+S:
- The screen grays out, and a Snipping Tool menu appears at the top.
- Choose from four options (rectangular, freeform, window, full-screen).
- Captured screenshots are saved to the clipboard.
- Paste and adjust it in another location.
Method 4: Snipping Tool for Delayed Screenshots
The Snipping Tool, available since Windows Vista, remains in Windows 11. Follow these steps:
- Search for Snipping Tool and launch it.
- Select your desired snip type (rectangular, freeform, window, full-screen) and a delay (3, 5, or 10 seconds).
- Press Win-Shift-S to take the delayed screenshot, which is copied to the clipboard.
- Make changes in the preview and save the screenshot to your computer.
If you’re interested also read on – How to remove recycle bin from desktop
Summary
In conclusion, mastering screenshot techniques for Windows 10 and Windows 11 provides diverse options for different needs. Whether you require swift full-screen captures, precise window snapshots, or advanced editing tools, these methods together form a comprehensive approach to capturing visuals.”


